-
-
products
-
resources
-
support
-
company
-
Using File History in Windows 8
By Steve Horton May 21, 2013backup, file history, windows 81 CommentThe Windows 8 File History utility provides an easy backup system for most of your personal files. Once set up, the program automatically follows a periodic schedule and copies to an external drive all the files stored in your Library folders and your desktop, favorites and contacts. It is not on by default, but it is easy to start, and you can customize various settings.
The backup tools provided in Windows 7 allow you to make image copies of your entire system, including all files and system files. You can’t make an image file of settings in Windows 8. Microsoft decided that the option is readily available in Windows 8 already.
You can access Windows 7 backup tools in Windows 8, but Microsoft advises that you do not use both sets of tools in Windows 8. Working smartly in the background, File History operates as a convenient and automatic process that will not interfere with your normal computer use.
Previous XP And Vista Versions
Previous backup tools included the Backup or Restore Utility that was provided in versions of Windows XP. A wizard allowed you to backup the My Documents folder plus your browser favorites, the desktop and cookies. You could also backup all your computer’s information and create a system recovery disk. There was an Advanced Mode that offered different kinds of backup but you could not normally backup on external drives.
After creating your initial backup under Windows Back Up Files Wizard, you could automate the process by setting up a daily, weekly or monthly backup schedule. You could backup to an external USB media or a DVD disk. System and application files were not included in the process, but were handled under business and professional versions of Windows with a Complete PC Backup utility.
Using File History
To use Windows 8 File History, first make sure you have an external drive with adequate space attached to your computer. File History is not turned on by default, so you must first activate it.
- Press Windows Key + X
- Click Search
- Type File History
- Click Settings
- Click File History
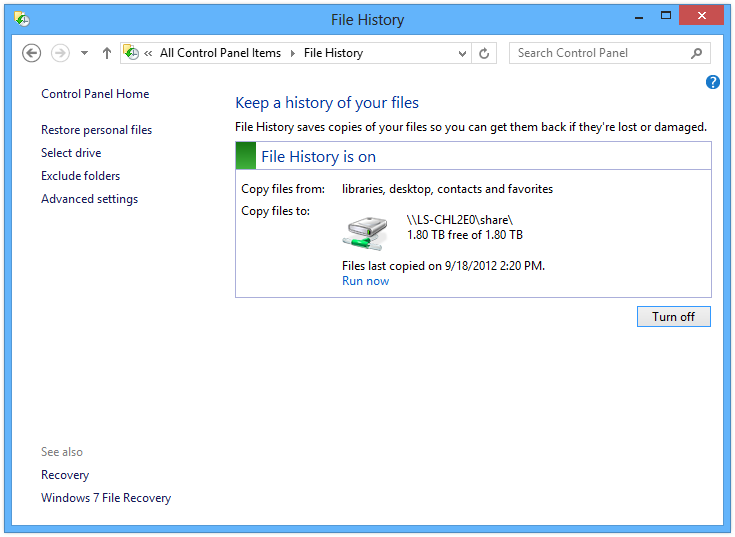
As you can see in the screenshot, it allows you to copy files from libraries, desktop, contacts and favorites and it recognizes the external hard drive receiving the backup.

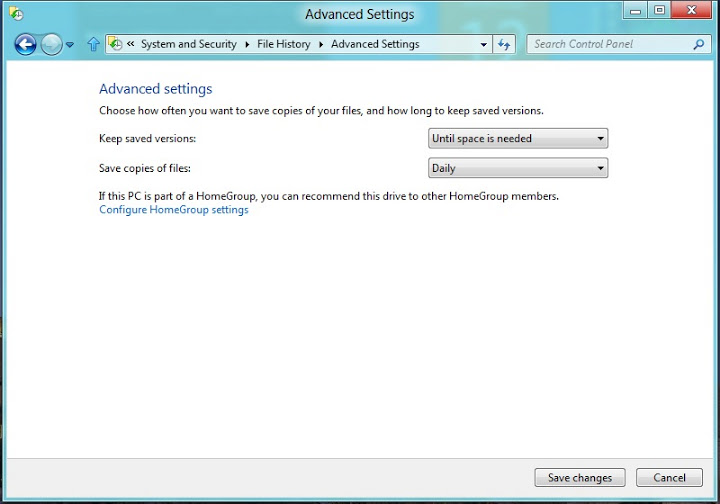
File History OnChoices on the left provide you the ability to restore files, select the drive for backup, exclude folders and the Advance Settings Window pictured below.

Advanced SettingsAdvance Settings allows you to choose the backup interval — the default is every hour — and how long you want to keep the backup copies. You set how much of your home drive space to use for a temporary cache if the external drive is not presently available. If you are part of a HomeGroup network, you can also set the backup drive as a default for other members of the network. Files are saved with a date and time stamp.
Restoring Files
Typing Restore Your Files instead of File History in the steps above gets you to the File History Home Screen. Here, you will see icons of your Contacts, Desktop and Favorite file folders and Libraries that you have backed up. Select what files you want to restore from these folders and click Restore at the bottom of the screen, and the Replace or Skip Files screen will appear.

Restore Your FilesYou can preview files before restoring by double clicking them. The Compare info for both files selection enables you to see specs on previous versions of the file in a File Conflict window. You can decide what version of the file you want to restore.
Was this post helpful?YesNoFree Driver Updates
Update your drivers in less than 2 minutes to enjoy better PC performance - Free.
Free Driver Updates
Update your drivers in less than 2 minutes to enjoy better
PC performance - Free.
Didn't find your answer?Ask a question to our community of experts from around the world and receive an answer in no time at all.most relevant recent articles Pin It on Pinterest