| Snažíme se lokalizovat naše webové stránky v co největším počtu jazyků, jak je to možné, ale tato stránka je v současné době stroje přeloženy pomocí Google Translate. | zavřít |
-
-
produkty
-
prostředky
-
podpora
-
společnost
-
Krok za krokem instrukce pro dual boot Windows XP a Windows 7Step by Step Instructions for Dual Booting Windows XP and Windows 7
Podle Steve Horton Září 27, 2013dual boot, Windows 7, Windows XP4 CommentsInstalace nového operačního systému je vzrušující, ale někdy obtížný a nervózní proces. Nastavení zařízení na dvou operačních systémech se systémem dual boot může být ještě více frustrující. Dvojité zavádění je proces dvou samostatných operačních systémů nainstalovaných na jednom počítači s možností výběru, do kterého se má zavést.
Ať už si zvolíte dvojí zavedení, protože nejste spokojeni s inovacemi, nebo jednoduše proto, že se vám líbí aspekty jednotlivých operačních systémů, proces je stejný. Windows 7 je velký upgrade z Windows XP, přesto mají oba operační systémy své výhody. Naštěstí je proces dvojího bootování mezi nimi poměrně jednoduchý.
Který operační systém nejdříve nainstaluji?
Možná to nebude vypadat jako velký problém, ale pořadí, ve kterém instalujete každý operační systém, je důležité. Zatímco je možné nainstalovat v libovolném pořadí, instalace Windows XP před Windows 7 je vhodné. Důvodem to má co dělat s Správcem zavádění systému Windows.
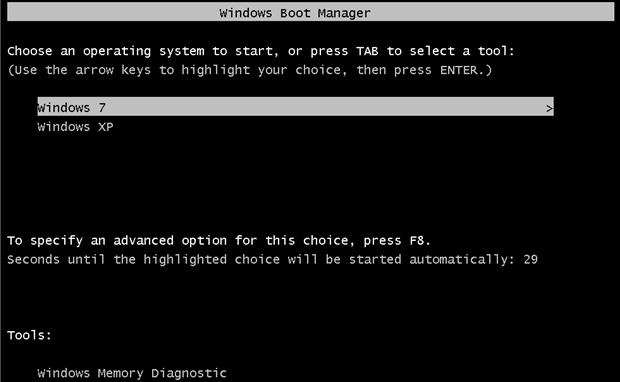
Správce spouštění systému Windows je program, který běží před systémem Windows a umožňuje zvolit, který operační systém se má spustit. Systém Windows XP má starší verzi tohoto programu a jeho instalace do zařízení s již nainstalovaným systémem Windows 7 nainstaluje starší verzi systému Windows Boot Manager. Tato starší verze nebude rozpoznávat budoucí verze systému Windows, například systém Windows 7, a ve výchozím nastavení bude spouštět do systému XP. Instalace systému Windows XP po systému Windows 7 by vyžadovala přeinstalaci aktualizované verze Správce zavádění systému Windows k vyřešení tohoto problému ještě předtím, než budete moci zavést dvojité spouštění.
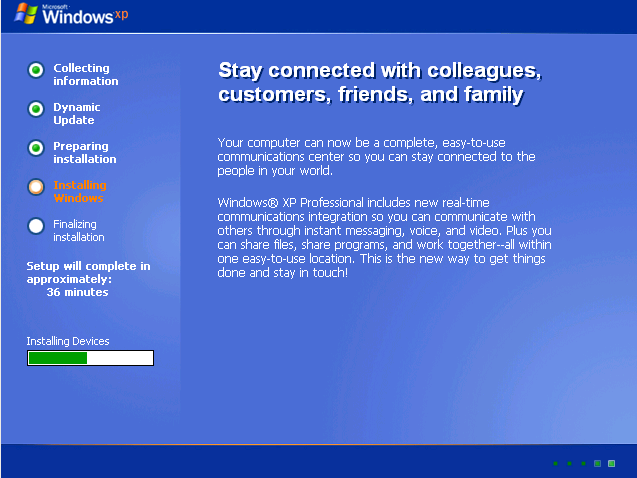
Instalace systému Windows XP
První věc, kterou musíte udělat, je nainstalovat kopii systému Windows XP do počítače. Pokud jste ji již nainstalovali, můžete přejít na další krok.
Chcete-li nainstalovat systém Windows XP, potřebujete následující položky:
- Legitimní CD se systémem Windows XP
- Produktový klíč systému Windows XP
- Počítač, který splňuje minimální požadavky pro systém Windows XP
Ať už máte nainstalovaný jiný operační systém, postup instalace systému Windows XP je stejný. Měli byste však vzít na vědomí, že instalace systému Windows XP přepíše jakýkoli jiný operační systém na pevný disk, který jej instalujete.
Chcete-li nainstalovat systém Windows XP:
- Umístěte CD se systémem Windows XP do počítače a restartujte.
- Stiskněte mezerník po zobrazení výzvy k zavedení z disku CD-ROM systému Windows XP.
- Postupujte podle pokynů na obrazovce a přijměte Licenční smlouvu systému Windows XP.
- Klepněte na pevný disk, na který chcete nainstalovat operační systém. Tím se vymažou všechna data nebo OS, které jsou aktuálně nainstalovány na pevném disku.
- Stiskněte klávesu Enter a klepněte na Neparticipovaný prostor
- Dalším stisknutím klávesy Enter tento prostor naformátujte do systému souborů NTFS, což je souborový systém používaný systémem Windows XP.
- Po naformátování pevného disku se systém Windows XP restartuje a zobrazí několik možností. Klepněte na oblast a jazykové možnosti, které se na vás vztahují.
- Zadejte své jméno a další informace pro přizpůsobení instalace.
- Zadejte kód Product Key ze zadní části krabice na disk CD. Tím ověříte, že máte legální kopii systému Windows.
- Postupujte podle pokynů na obrazovce a zadejte příslušné informace. Čas a datum, uživatelská jména, hesla atd.
- Systém Windows XP se znovu spustí a začne poslední krok.
Jakmile jste v posledním kroku instalace, pokračujte podle pokynů na obrazovce, dokud nebudete požádáni o připojení k Internetu. Poté vás požádá, abyste nakonfigurovali připojení k Internetu. To se provádí připojením kabelu Ethernet ze směrovače nebo modemu nebo zadáním informací o bezdrátové síti. Systém Windows se vás zeptá, zda jste připraveni k aktivaci. Výběrem možnosti yes ověříte kopii s produktem Microsoft, abyste prokázali, že je to legitimní verze.

Instalace systému Windows XPVytvoření oddílu pro systém Windows 7
Jakmile máte nainstalovanou kopii systému Windows XP, je čas vytvořit na pevném disku oddíl pro systém Windows 7. Oddíl je část pevného disku, který je označen jako samostatný pevný disk. Umožňuje vám nainstalovat více operačních systémů bez toho, aby se vzájemně vzájemně konfliktovaly.
Vytvořit tento oddíl zevnitř Windows XP:
- Klepněte na tlačítko Start a na příkaz Ovládací panely.
- V okně Ovládací panely klepněte na položku Výkon a údržba při třídění podle kategorií a potom na položku Nástroje pro správu .
- V nástrojích pro správu klepněte na položku Správa počítače .
- Klikněte pravým tlačítkem myši na pevný disk obsahující systém Windows XP.
- Klepněte na tlačítko Snižte hlasitost .
- Zadejte částku, kterou chcete zmenšit aktuální hlasitost, a klepněte na tlačítko Zmenšit . To bude velikost MB dostupná pro oddíl, který vytvoříte pro systém Windows 7. Budete potřebovat alespoň 16 GB pro 32bitový systém Windows 7 a 20 GB pro 64bitový systém Windows 7.
- Klepněte pravým tlačítkem myši na novou nepřidělenou oblast, která byla vytvořena po zmenšení a klepněte na tlačítko Nový oddíl .
- Klepněte na položku Primární oddíl a klepněte na tlačítko Další .
- Klepněte na velikost nového oddílu a klepněte na tlačítko Další .
- Přiřaďte písmeno jednotky a klepněte na tlačítko Další .
- Klepněte na tlačítko Formátovat tento oddíl s následujícími nastaveními .
- Klepněte na systém souborů NTFS, výchozí velikost jednotky přidělení, klepněte na název nového svazku a klepněte na tlačítko Další .
Po vytvoření oddílu je čas nainstalovat systém Windows 7.
Instalace systému Windows 7
Postup instalace systému Windows 7 je velmi podobný instalaci systému Windows XP.
Chcete-li nainstalovat systém Windows 7, potřebujete následující položky:
- Legitimní DVD s Windows 7
- Produktový klíč systému Windows 7
- Počítač, který splňuje minimální požadavky pro systém Windows 7
Chcete-li nainstalovat systém Windows 7:
- Umístěte disk Windows 7 do počítače a restartujte jej.
- Po zobrazení výzvy stiskněte tlačítko pro spuštění z disku DVD.
- Postupujte podle pokynů na obrazovce a klikněte na vaše předvolby.
- Přijměte licenční podmínky.
- Klikněte na položku Vlastní instalace .
- Systém Windows se pak zeptá, kam chcete nainstalovat systém Windows 7. Klepněte na oddíl, který jste dříve vytvořili.
- Postupujte podle pokynů na obrazovce a zadejte předvolby a kód Product Key stejně jako u operačního systému Windows XP.
Po dokončení instalace systému Windows 7 musíte svou kopii aktivovat do 30 dnů. Aktivace v systému Windows 7 je stejně jednoduchá jako systém Windows XP.
Aktivace vaší kopie:
- Nejprve se musíte připojit k Internetu. Stejně jako u systému Windows XP to můžete provést pomocí kabelu Ethernet nebo bezdrátové sítě.
- Klikněte na tlačítko Start a klikněte pravým tlačítkem myši na Počítač .
- V seznamu klepněte na příkaz Vlastnosti .
- Klikněte na možnost Aktivovat systém Windows nyní .
- Možná budete vyzváni k zadání hesla správce. Zadejte ji v případě potřeby.
- Zadejte výrobní klíč, klikněte na další a postupujte podle pokynů na obrazovce.
Dvojité zavedení systému Windows XP a Windows 7
Nyní, když jste dokončili instalaci každého operačního systému, můžete nyní po spuštění počítače dvakrát spustit. Budete se setkat s manažerem zavádění systému Windows a seznamem každého nainstalovaného operačního systému. Jednoduše klikněte na požadovanou verzi systému Windows a váš počítač udělá zbytek.

Dual Boot s Správcem zavádění systému WindowsWas this post helpful?YesNoVolný, uvolnit Aktualizace ovladačů
Aktualizujte své ovladače za méně než 2 minuty, abyste si mohli užívat lépe výkon PC - Volný, uvolnit.
Volný, uvolnit Aktualizace ovladačů
Aktualizujte své ovladače za méně než 2 minuty, abyste si mohli užívat lépe
výkon PC - Volný, uvolnit.
Nenašli jste odpověď?Zeptejte se na naší komunity odborníků z celého světa a obdržet odpověď v žádném okamžiku vůbec.most relevant poslední články Připněte si to na Pinterest